Mirror Finish, No Etch Reaction — The Smearing Problem in Soft Metals

Here is a frustrating scenario every metallographer eventually hits: the polish looks perfect — mirror finish, no scratches, no relief — and you reach for nital, or Keller''s, or NH₄OH/H₂O₂, and nothing happens. Increase the time, get a faint blotchy etch. Increase the concentration, get a heavily etched surface that still does not show grain boundaries. The microstructure will not appear no matter what you try.
This is the classic smearing failure mode and it is most common on soft, ductile metals: copper, aluminum, magnesium, lead, tin, and to a lesser extent austenitic stainless and pure nickel.
What is happening
Mechanical polishing does not just remove material — it deforms the surface layer in the direction the abrasive is moving. On a hard sample like quenched 1095, that deformed layer is thin and brittle and the next finer step removes it cleanly. On copper, the deformed layer is plastic and flows. The diamond particles smear it across the surface like spreading butter, producing a perfectly flat layer that is no longer single-crystal — it is a mechanically-disturbed zone that has lost the orientation of the underlying grains.
Chemical etchants work by selectively attacking the boundaries between differently-oriented grains, or the boundaries between phases. A smeared surface has no orientation differences left at the surface — they have been mechanically homogenized. So the etchant finds no boundaries to attack, and you get either no reaction or a uniform overall darkening.
The diagnostic question
Ask yourself: when the etchant hits the surface, does it bead up, dry quickly, or change color?
- No reaction at all → smeared surface. The most common cause.
- Etchant beads up → wettability problem. Surface is contaminated with hand oils, residual polishing compound, or skin contact. Rinse with ethanol and re-etch immediately.
- Etchant changes color quickly but no structure appears → etchant is over-spent. Mix fresh.
The fix: chemo-mechanical final polish
You cannot remove a smeared layer with more mechanical polishing alone — you just create a new smeared layer. The proper fix is a chemo-mechanical final step where chemistry attacks the deformation zone while mechanical action removes the products.
The standard combinations:
- Copper and brass: Colloidal silica + 5–10% hydrogen peroxide on a chemotextile pad, 3–5 minutes. The H₂O₂ chemically attacks the disturbed Cu surface; the silica abrades the oxide products away. Add the H₂O₂ to the silica suspension immediately before use — the activity decays in minutes.
- Aluminum: Colloidal silica alone on chemotextile is usually sufficient. For stubborn cases, vibratory polish for 1–4 hours.
- Titanium: Colloidal silica + 30% H₂O₂ at a 5:1 ratio. The peroxide is essential — Ti maintains its deformation layer stubbornly without the chemical assist.
- Magnesium: Cannot tolerate water in the final polish. Use ethanol-based colloidal silica.
- Lead, tin, very soft metals: Vibratory polishing with colloidal silica for several hours is often the only path to a clean surface.
Verification
After the chemo-mechanical step, the surface should still look mirror-bright but the etchant will now reveal structure within seconds. If it still does not, examine the surface with differential interference contrast (DIC) or polarized light: a smeared surface looks featureless under DIC, while a properly-prepared surface shows the height contrast of grain orientations.
The lesson
Soft, ductile metals do not give you a properly prepared surface from purely mechanical polishing. The recipe must include a chemo-mechanical or vibratory finishing step. If your standard recipe ends with 1 µm diamond, you are leaving the deformation in place. Add the chemo-mechanical step and the etch behavior changes from "I cannot get this to work" to "this is the easy part."
For more on the underlying physics, see the Polishing Methods guide. For copper-specific recipes, see the Copper Alloys Preparation guide.
Want to Learn More?
Explore our comprehensive guides for detailed step-by-step instructions on sample preparation techniques.
Browse GuidesRelated Posts

Pull-Out vs. Real Porosity — Reading the Pit, Not Just Counting Pits
Smooth, rounded pits are the original sample. Irregular, fresh-fracture pits are prep damage. Mistaking one for the other can mean a wrongly-rejected casting or a wrongly-accepted bad weld.
Read More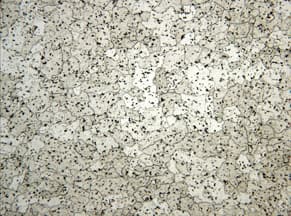
Tiny Dark Specks in Your Aluminum Sample — Embedded SiC, and How to Stop It
Those random dark dots on your polished Al, Pb, Sn, or Mg sample are loose silicon carbide grit ground into the surface. The fix is changing your grinding abrasive, not your polishing.
Read More
Comet Tails Behind Hard Particles — Diagnosing and Fixing Drag Damage
Comet tails are the visual signature of hard particles dragged across a soft matrix during polishing. The fix is force, rotation, and pad selection — not more polishing time.
Read More